Welcome to the latest WooCommerce how-to!
WooCommerce is one of the most popular ecommerce platforms out there, working hand in hand with WordPress, a Content Management System (CMS) equally in demand.
Best of all, WooCommerce integrates seamlessly with Khaos Control Cloud, eliminating the annoyance of separate logins, and keeping site and business management software on the same page.
That’s why, to harness the power of this integration, we’ve sought to get you up and running with blogs covering initial setup and product creation. But following these will only have taken you so far. Now you’re ready to step out into the world of ecommerce, armed with WooCommerce, WordPress and Khaos Control Cloud, to start selling!
Selling products via WooCommerce has two aspects – the options by which you’ll receive payments for goods and the tax you’ll pay on them. We’ll tour those options, assessing their pluses and minuses, and progress to the intricacies of tax, which, while we stress we can’t advise on to the point your business will be doing everything by the taxman’s book, will provide the overview necessary for you to begin to tweak WooCommerce’s tax settings to your business’ particulars.
First, payment options.
Payment Option Overview
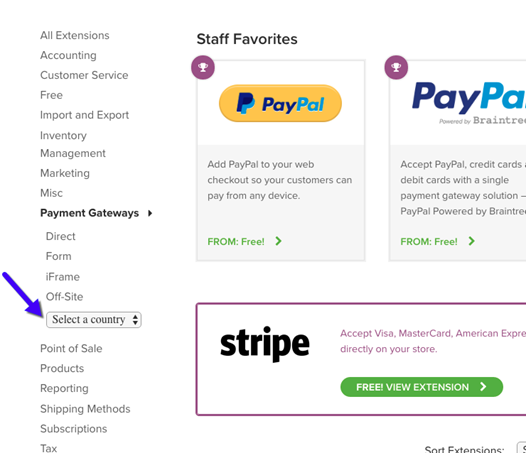
The first thing to note is the abundance of payment options, specifically referred to as payment gateways, available on WooCommerce. We’ll drill into what these are and how to choose them.
Payment gateways, as they relate to WooCommerce, are plugins that allow customers to pay for goods and services using third party services, like PayPal or Stripe. Each requires registration, and each have distinct terms and fees it’s well worth exploring, and asking about directly from those services, if needs be. Some have multiple options based on different account types, transaction types or redirect methods, such as PayPal and Authorize.net.
Choosing Payment Gateways
When selecting and setting up a Payment Gateway, it’s important to consider:
- Cost
- Location
- Security
- Redirect: Customer is forwarded to the Payment Gateway site to process payment, then redirected back to your site to complete checkout.
- Direct: Customer purchases and pays directly on your site, requiring an SSL certificate as part of PCI Compliance.
- Support for WooCommerce Subscriptions (if applicable).
Cost
Startup and ongoing costs are different for each payment gateway and can consist of:
- Purchase of the payment gateway, if not free
- Sign-up fee charged by the payment gateway/processor
- Monthly/yearly subscription fees
- Transaction fees
Location
Shop location and currency are factors. A payment gateway company/processor may only serve merchants based in certain countries. If it only supports U.S. dollars and accepts U.S. shop owners, shop owners in Canada and Europe cannot use it.
However, customers from all over the world can use the gateway to check out and pay.
Security
It’s crucial to note that, as a shop owner, you’ll have a responsibility to safeguard sensitive customer information. That includes email addresses, shipping addresses and billing information.
To accomplish this, many payment gateways use an SSL certificate, which encrypts communications between customers and your site, and then your site and payment processor.
The Payment Card Industry Data Security Standard (PCI-DSS) covers the other aspects of your site that deal with anyone storing, processing or transmitting credit card data.
How many will you need?
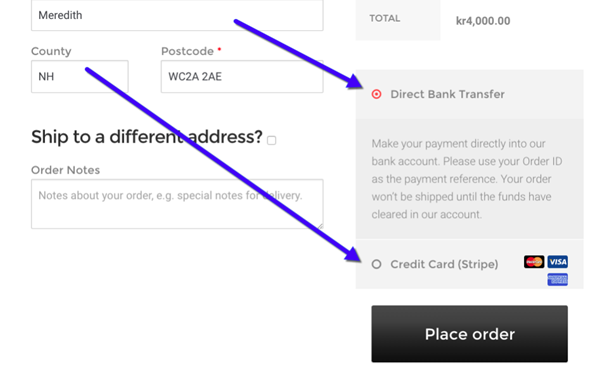
At least one method is necessary, but usually not sufficient, to collect payments on your site. By this we mean that, while you can receive payments with just one method, it’ll open you up to the risk that payment gateway experiences downtime, or some other issue, such that you won’t be able to take payments at all. It’s better to employ two methods, because, chances are, two won’t be down at the same time. And while this risk can be slimmed further with additional methods, you can get overwhelmed with administration and customers can get overwhelmed by choice. So, two methods, we recommend, is the sweet spot.
Here’s an example of two payment gateways on the checkout page:
Free vs. Premium
WooCommerce features several free payment options, called Core Payment Options, with Premium gateways available at extra expense. The Core options are listed here and the Premium ones here.
Tax Set Up
This is one of the first things you’ll want to do when establishing your store. Taxes are complex, but WooCommerce’s aim is to make setting them up easy.
Enabling Taxes
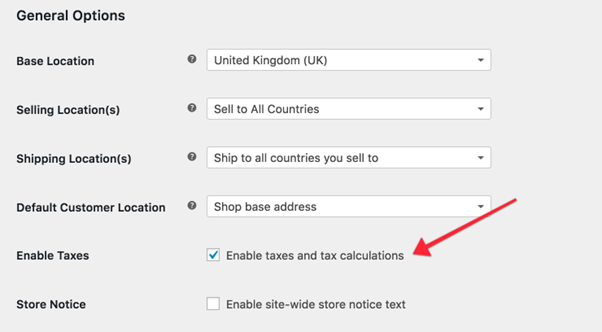
To access the tax settings screens, they first need to be enabled.
- Go to: WooCommerce > Settings.
- Select the Enable Taxes.
- Save changes.
Configuring Tax Options
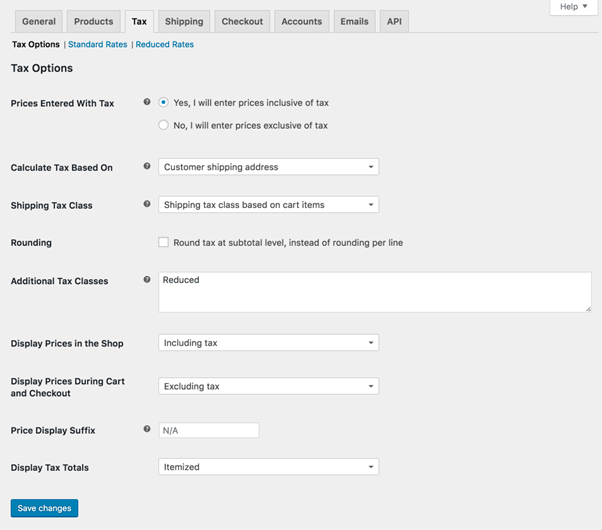
To begin configuring taxes, go to: WooCommerce > Settings > Tax. It’ll only be there if taxes are enabled.
This tab shows a variety of options – options specific to the tax jurisdiction under which you’re based.
Prices Entered with Tax
This option matters most for managing taxes as it determines the way product prices are entered.
- “Yes, I will enter prices inclusive of tax” means that all catalogue prices are entered using your base tax rate.
For the UK, prices are entered inclusive of the 20% tax rate e.g. You enter a product price of £9.99 that includes £1.67 tax. Consequently, UK customers would pay £9.99, while a US customer would only pay £8.32.
- “No, I will enter prices exclusive of tax” means catalogue prices need to be tax exclusive.
Using this example, a UK shop would enter 8.32 as the product price. 20% tax would be applied on top of this, making the ultimate amount payable £9.99.
Calculate Tax Based On
This setting determines which address you’ll use for tax calculations.
- Customer billing address
- Customer shipping address (default)
- Store base address
If you store base address, taxes will be based on store location, not your customer’s.
Shipping Tax Class
Shipping tax class is usually inherited from the item being shipped, so shipping a reduced rate item like baby clothes would also use a reduced rate. If this is not the case in your jurisdiction, choose an alternative tax class.
Rounding
If you enable Rounding tax at subtotal level, instead of per line, rounding will be performed at subtotal level. Check your tax jurisdiction to see if this is done.
Additional Tax Classes
Tax Classes are assigned to products. Most of the time, you’ll want to use the default “standard” class. For selling goods that need a different tax class (i.e., Tax, except zero-rated products), add the classes here.
Display Prices in the Shop
This determines how prices are displayed – whether inclusive or exclusive.
Display Prices During Cart and Checkout
This determines how prices are displayed in your cart and checkout pages – it works independently of catalogue prices. Choose from inclusive/exclusive tax display.
Price Display Suffix
Allows you to change display to “Prices include _% tax/VAT” or anything you deem appropriate. You can use these placeholders if you want to have text before and after the price:
- {price_including_tax}
- {price_excluding_tax}
For example: “Price incl. VAT: {price_including_tax}” will display as: “Price incl. VAT: $15”. If you’ve set the taxes to display excluding tax, you could add what the tax inclusive of tax will look like:

Display Tax Totals
This determines if multiple taxes get displayed as one or a list.
Setting Up Tax Rates
Tax classes are displayed at the tax screen’s top.
In the tax rates table, define tax rates (one per row). Click Insert Row to get underway.
Each tax rate has these attributes:
- Country Code – Two-digit country code for the rate. Use ISO 3166-1 alpah-2 codes. Leave blank (*) to apply to all countries.
- State Code – Two-digit state code for the rate. Leave blank (*) to apply to all postcodes.
- Postcode – Enter postcodes for the rate. Separate multiple values with a semi-colon (;), use wildcards to match several postcodes (e.g. PE* would match all postcodes starting with PE), and use numeric ranges (e.g. 2000-3000). Leave blank (*) to apply to all postcodes.
- City – Semi-colon separated list of cities for the rate. Leave blank (*) to apply to all cities.
- Rate % – Enter the tax rate, for example, 20.000 for a tax rate of 20%.
- Tax Name – Name your tax, e.g. VAT.
- Priority – Set a priority for this tax rate. Only one matching rate per priority will be used. To set multiple tax rates for a single area, specify a different priority per rate.
- Compound – If this rate is compound (applied on top of all prior taxes), check this box.
- Shipping – If this rate also applies to shipping, check this box.
Tax Rate Examples
Here is an example of a tax setup for a UK store – 20% for UK customers only.

Import and Exporting Rates
There are Import CSV and Export CSV buttons below the table. Use them to import and export tax rates from and to a CSV file.
CSV files for importing need 10 columns;
country code, state code, postcodes, cities, rate, tax name, priority, compound, shipping, tax class
Ensure you leave tax class blank for standard rates.
Deleting Tax Rates
If you incorrectly added tax rates, or the CSV import has incorrectly added tax lines, this information must to be deleted.
To delete:
- Go to: WooCommerce > Settings > Tax > Your Tax Rates (Standard, Reduced Rate, Zero Rate)
- Select the incorrect lines by clicking on them. They will be highlighted in yellow.
- Select Remove Selected Rows. This will remove the highlighted rows.
- Save changes.
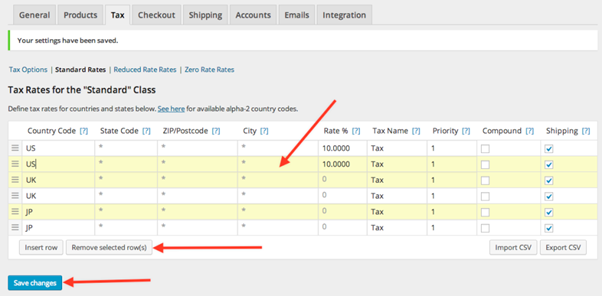
If you want to delete all tax rates at once, use the ‘Delete all WooCommerce tax rates’ option in WooCommerce > System Status > Tools.

Viewing Tax Reports
Tax reporting can be found in WooCommerce > Reports > Taxes > Taxes by Date > Year.
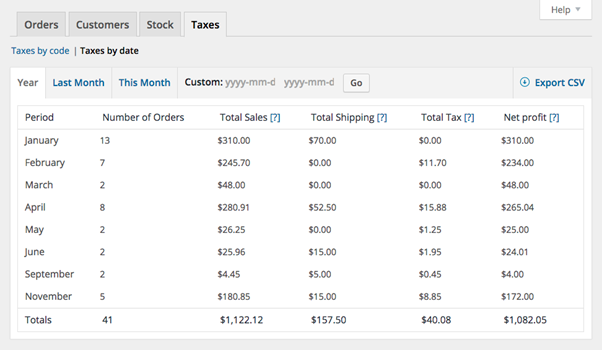
Going to Reports > Taxes > Taxes by code displays a different report, showing taxes separately.

Conclusion
So, there we have it – a whirlwind introduction to selling products on WooCommerce!
These blogs, our WooCommerce guides, are the direct result of our philosophy. Our philosophy that the business of business should be as easy, as accessible and as enjoyable as possible.
That’s why we coded Khaos Control Cloud, an innovative Business Management Solution, that gives you critical control of your business whenever you are.
It’s why we created the perfect marriage of WooCommerce and Khaos Control Cloud with our powerful integration.
And it’s why we wrote about getting up to speed with WooCommerce in the first place, so you could benefit from that power.
If you’re now up and running with WooCommerce, but aren’t with Khaos Control Cloud, make today the day you future-proofed your business and primed it for limitless growth. Make today the day you signed up for a free, no-obligation Khaos Control Cloud demo!

